By: Sarah Wilkins, PT, DPT; LSVT BIG Certified
Operations Director, Kilmarnock Location
Flexibility is an important component of physical fitness and has many positive effects on the body. For instance, it improves mobility, posture, muscle coordination, reduces the risk of injuries and muscle soreness. It even leads to a better overall “shape”.
A lack of flexibility makes normal daily activities more difficult to do, leading to reduced mobility and excessive stiffness over time. Therefore stretching your muscles regularly will help avoid loss of mobility, decrease pain, and promote normal movement.
Flexibility exercises range from very light to advanced stretching. Whether you do very easy or advanced stretching is based on your activity level and current flexibility. You may start at any level, but if you are unsure start with level 1 and progress from there working your way up to level 3!
This stretching program should always be done in conjunction with a regular exercise program including aerobic exercise and strengthening activities.
disclaimer: These stretches may cause minor soreness or slight discomfort, if they cause more than slight discomfort and you are unable to complete them you want to stop the exercise and contact US.
READY? SET? STRETCH!
Level 1: Easy Stretches
Easy Hamstring Stretch
- Lie on your back, bend one knee, and place both hands behind your thigh (Photo A).
- Your hip should be bent to 90 degrees with your thigh pointing straight at the ceiling.
- Straighten out your knee as far as you can. Keep your thigh pointing to the ceiling and your other leg flat on the floor or bed (Photo B). You should feel a stretch behind your thigh and knee.
- Hold this position for 15 seconds. Repeat two to three times or more, as you feel matches your fitness level.
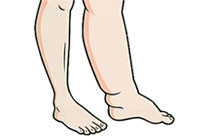
Easy Groin Stretch
- Stand with your legs shoulder width apart.
- Lunge to one side, allowing your lunging knee to bend.
- You should feel a stretch in the groin area of the leg you kept straight.
- Hold this position for 15 seconds. Repeat two to three times or more, as you feel matches your fitness level.
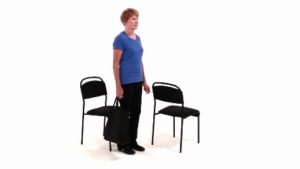
Easy Quad and Hip Flexor Stretch
- Stand next to a wall to assist with balance and place a chair directly behind you.
- Face away from the chair and place the top of your shin and foot on the chair (Photo A).
- Try to keep your knees in line and as close together as possible.
- Slowly push your waistline/belt forward to get more stretch.
- Hold this position for 15 seconds. Repeat two to three times or more, as you feel matches your fitness level.
For more challenge, remove the chair and do the following:
- Stand next to a wall to help with balance.
- Bend your knee and grasp your ankle (Photo B).
- Pull your heel toward your buttocks, keeping your legs in line with one another.
- Keep your knees as close together as possible.
- Hold this position for 15 seconds. Repeat two to three times or more, as you feel matches your fitness level.
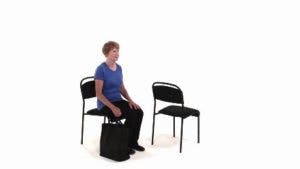
Easy Calf Stretch
- Sit in a chair with one leg out in front of you.
- Loop a belt or a strap around the bottom of the front of the foot on your outstretched leg.
- Gently pull the strap so that your toes come toward you as your heel stays in place on the floor.
- You should feel a stretch in the back of your calf.
- Hold this position for 15 seconds. Repeat two to three times or more, as you feel matches your fitness level.
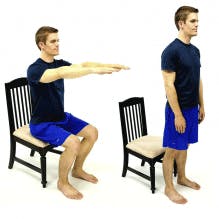
Easy Overhead Reach
- Stand with the back of your heels against a wall. Stand upright as tall as you can with good posture (Photo A).
- Keeping your best posture and your back against the wall, slowly raise your arms in front of you, reaching. Try to get your arms/hands all the way back to the wall or go as far as you can. Reach up toward the ceiling to feel the stretch (Photo B).
- Then slowly bring your arms down to your side, so they are level with the floor (Photo C).
- Try to keep your arms and hands against the wall if you can, then slowly return to the starting position.
- Do these movements slowly and steadily.
- Repeat two to three times or more, as you feel matches your fitness level.
Easy Spine Flexion and Extension
- Lie on your back and bend one hip and knee up toward your chest (Photo A).
- Grasp your knee with your hands and squeeze it toward your chest.
- You should feel a stretch across your back.
- Hold this position for 15 seconds. Repeat two to three times or more, as you feel matches your fitness level.
As we age, we often spend more time in a flexed posture due to sitting for long periods of time, poor posture, or sleeping in side-lying positions. This can cause loss of spine extension and make it difficult to stand upright. To combat this:
- Lie face down on your stomach on the floor (Photo B). If you do not typically lie on your stomach, try to hold this position for 20-30 seconds. You may feel a stretch in your back across your waistline.
- Then roll back onto your side for 30 seconds to relax this stretch.
- Repeat two to three times or more, as you feel matches your fitness level.
- If this position is too uncomfortable for you based on age or history of spine pain, do not do this exercise without talking with your physical therapist.
Easy Trunk Rotation
- Start by sitting on the front edge of an armchair with your feet flat on the floor and your hips facing forward (Photo A).
- With one arm reach across to the opposite arm of the chair and gently pull/turn your shoulders and upper body to that side (Photo B).
- Do not allow your hips/pelvis to rotate. Keep pelvis facing forward.
- Hold this position for 15 seconds.
- Return to your starting position and repeat on the other side.
- Repeat two to three times or more, as you feel matches your fitness level.
Level 2: Moderate Stretches
Before you begin any level of stretching, follow these tips for best results:
- Warm up for a few minutes first so your muscles stretch more easily (walk briskly, march in place, or do another physical activity).
- Stretch at least two to three times on each side, taking turns.
- Keep good form and posture.
- Breathe throughout each stretch — never hold your breath.
- You should feel slight discomfort and a pulling sensation, but not pain, with each stretch.
- Never bounce while stretching — hold steady till you feel the stretch and try to relax while holding.
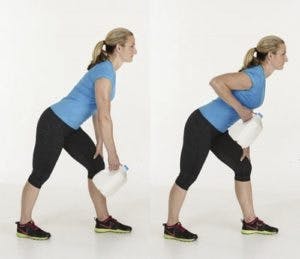
Moderate Hamstring Stretch
- Stand facing a yoga block or footstool that doesn’t slide. Use a stool or block height that is lower if you are less flexible. Increase the height of the item as you become more flexible.
- Place one heel on the center of the stool, keeping your hips square/facing the stool and place both hands on the outside of your thigh (Photo A).
- Lean forward, leading with your chest and keep your head up as you slide your hands down the outside of your thigh. Do not allow your back to round or bring your chin down (Photo B).
- Do not round your back or lower your chin. Keep looking straight ahead.
- You should feel a stretch behind your thigh and knee.
- Hold this position for 15 seconds. Repeat two to three times or more as you feel matches your fitness level.
Moderate Groin Stretch
- Sit on the floor with your back against the wall. Put the soles of your feet together.
- Pull your heels toward your body. You should feel a stretch in your groin.
- For more stretch, push down on your knees.
- Hold this position for 15 seconds. Repeat two to three times or more, as you feel matches your fitness level.
Moderate Quad/Hip Flexor Stretch
- Lie on your stomach.
- Bring the leg you will stretch slightly out to the side, bend your knee, and loop a belt or a strap around your ankle.
- Bring your knees back together. Gently pull on the strap so that your heel comes as close to your buttocks as possible.
- Hold this position for 15 seconds. Repeat two to three times or more, as you feel matches your fitness level.
For more challenge:
- Lie on your stomach.
- Bring the leg you will stretch slightly out to the side, bend your knee, and grasp your ankle, pulling your heel to your buttocks.
- Bring your knees back together, keeping your heel as close to your buttocks as possible.
- Hold this position for 15 seconds. Repeat two to three times or more, as you feel matches your fitness level.
Moderate Calf Stretch
- Stand upright with your palms flat against a wall and the leg you want to stretch behind you (Photo A).
- Turn your toes in and your heel out on your back foot (Photo B).
- Leading with your waist and allowing your arms and front knee to bend, lean toward the wall, and keep the heel of your back leg on the floor.
- First, do this exercise with the back knee straight. Then bend your back knee slightly while keeping your heel on the floor for added stretch.
- You should feel a stretch in the back of your calf.
- Hold this position for 15 seconds. Repeat two to three times or more, as you feel matches your fitness level.
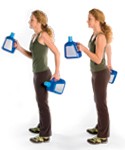
Moderate Overhead Reach
- Stand tall at the front edge of a doorway.
- Place the outside of your hands (little finger side) on both sides of the doorway (Photo A).
- Slide your hands up the doorway (Photo B), then slowly lean or step toward — but not through — the door.
- Hold this position for 15 seconds. Repeat two to three times or more, as you feel matches your fitness level.
Moderate Spine Flexion and Extension
As we age, we often spend more time in a flexed posture due to prolonged sitting, poor posture, or sleeping in side-lying positions. This can cause loss of spine extension and make it difficult to stand upright and keep good posture. To combat this:
Flexion
- Lie on your back and bring one knee and then the other toward your chest.
- Grasp both knees with your hands and squeeze them toward your chest (Photo A).
- You should feel a stretch across your back.
- Hold this position for 15 seconds. Repeat two to three times or more, as you feel matches your fitness level.
Extension
Caution: If this position is too uncomfortable for you based on age or history of spine pain, do not do this exercise.
- Lie on your stomach and put your arms and elbows under your chest.
- Prop up on your elbows as shown and relax your back. Do not look up. Pretend you are reading a book while lying on your stomach.
- If comfortable enough, hold this position for 30 seconds, then come back to a flat position lying on your stomach. Repeat two to three times or more, as you feel matches your fitness level.
Moderate Trunk Rotation Stretch
- Lie on your back with your hips and knees bent. Your hands and arms should be shoulder high and stretched out to the side (Photo A).
- Your arms and shoulders should stay flat on the floor.
- Keeping both knees together, allow your hips and pelvis to rotate to one side (Photo B).
- Hold this position for 15 seconds. Return to your starting position and complete these steps on the other side. Repeat two to three times or more for each side, as you feel matches your fitness level.
Level 3: Advanced Stretches
Before you begin any level of stretching, follow these tips for best results:
- Warm up for a few minutes first so your muscles stretch more easily (walk briskly, march in place, or do another physical activity).
- Stretch at least two to three times on each side, taking turns.
- Keep good form and posture.
- Breathe throughout each stretch — never hold your breath.
- You should feel slight discomfort and a pulling sensation, but not pain, with each stretch.
- Never bounce while stretching — hold steady till you feel the stretch and try to relax while holding.
Advanced Hamstring Stretch
- Stand facing a chair or counter and put your heel on top of it. Choose a chair if you are less flexible or a counter if you are more flexible.
- Keep your hips directly facing the chair and place both hands on the outside of your thigh.
- Lean forward, leading with your chest. Keep your head up as you slide your hands down the outside of your thigh. Do not allow your back to round or bring your chin down.
- You should feel a stretch behind your thigh and knee.
- Hold this position for 15 seconds. Repeat two to three times or more, as you feel matches your fitness level.
Advanced Groin Stretch
- Sit on the floor with your back against the wall. Keeping your knees straight, spread your legs apart as far as you can.
- Leading with your chest, place your hands together out in front of you, and lean forward. Do not allow your back to curl or bend.
- You should feel a stretch in your groin.
- Hold this position for 15 seconds. Repeat two to three times or more, as you feel matches your fitness level.
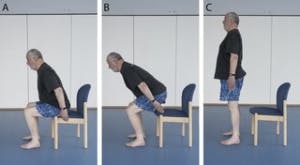
Advanced Quad/Hip Flexor Stretch
- Kneel on a pillow or folded towel and place one leg out in front of you (Photo A).
- Leading with your waistline and keeping your chest upright, lunge forward (Photo B).
- You should feel a stretch in the front of your hip. For further challenge, increase the stretch by grasping your back foot and try to bring your heel to your buttocks (Photo C).
- Hold this position for 15 seconds. Repeat two to three times or more, as you feel matches your fitness level.
Advanced Calf Stretch
- Stand on a stair with your heel over the edge.
- Slowly lower your heel so it falls below the stair and you feel a stretch in the back of your calf (Photo A).
- First, do this exercise with the back knee straight. Then try it with a slight bend of your knee for added stretch.
- Hold this position for 15 seconds. Repeat two to three times or more, as you feel matches your fitness level.
Advanced Overhead Reach
- Stand tall with your toes at the front edge of a doorway. Place the outside of both hands (little finger side) on the doorframe as high as possible (Photo A).
- Do NOT lean through the door. SLOWLY step through the doorway, keeping an upright posture (Photo B).
- Slowly step back to your starting position.
- You can do this stretch with your arms in various positions of elevation.
- Hold this position for 15 seconds. Repeat two to three times or more, as you feel matches your fitness level.
Advanced Spine Flexion and Extension
Flexion
- Sit on the front edge of a chair with your feet flat on the floor and your knees spread out as wide as possible (Photo A).
- Tuck your chin to your chest (Photo B) and slowly “roll down” from your head (curling down like a wave), allowing your arms and shoulders to go between your legs (Photo C).
- You should feel a stretch in your spine and low back.
- Hold this position for five to 10 seconds.
- To come back up, “unroll” from your waist back up to an upright sitting position. Repeat two to three times or more, as you feel matches your fitness level.
Extension
Caution: If this position is too uncomfortable for you based on age or history of spine pain, do not do this exercise.
- Lie on your stomach with your upper arms straight out at shoulder height, elbows bent to 90 degrees, and palms down.
- “Press up” and straighten out your arms keeping your waist on the floor, then slowly return to the starting position.
- Repeat this five to six times, slowly.
- Repeat another one to two times, locking your elbows and allowing your back to sag and “relax” in this position for five to 10 seconds, keeping your waist on the floor, then return to your starting position.
- Repeat two to three times or more, as you feel matches your fitness level.
source: choose PT provided by the American Physical Therapy Association: https://www.choosept.com/resources/detail/30-minute-home-stretching-program?fbclid=IwAR38vJpxBGq_DSjCx80Uwtfx5C2kUOJPBbPmSA3cAVgf_CFAwRapDfRPoGU#Level%201:%20Easy%20Stretches